
pintos 재시작, argument passing
재도입
21년에 지인과 둘이서 과제 1을 했던 핀토스는 언젠가 끝내야할 항상 입에 달고다니는 버킷리스트 같이 여기고 있었는데,
그 이후로 카이스트에서 하는 정글로 인해, 핀토스 자료가 기하급수 (진짜로)로 늘어났다.
분명 내가 과제 1을 할때만해도 정글이 막 나오던때라서 관련자료가 거의 바닥이다시피해서
몇 없는 자료 돌려보면서 이악물고 했었는데 이제는 세팅이나 이것저것 너무 자료가 쏟아져 나와 버렸다..
아무튼 핀토스 과제 1 이후로 42를 하고(정글에서 핀토스, csapp 랩 과제들을 하는걸 알고있었기에 사실 정글을 하고싶었다… 근데 정글은 졸업예정자가 조건이라 조건이 안된다고 생각해서 지원 자체를 안했다 지금 생각해보면 자격미달이라도 지원은 해볼만 하지않았나 생각하는)..
그대로 학교다니고 회사까지 가버려서.. 도저히 여유가 없었는데,
같이 하던 사람이 막 학년으로 핀토스를 끝내기위해서, 다시 잡았고, 지금 같이안하면 평생 못 끝낼걸 아니까.. 다시 잡았다.
가장 큰 변화는 기존 핀토스 대신 새로 세팅을 해서 진행하는거였는데 Userprog에서 막혀있었고.
핀토스를 처음할땐 실제 스탠포드 쪽 코드를 받아서 진행했었는데, 세팅이 정말 어렵고 gcc 등 버전도 너무 옛날이라 세팅전에 진짜 치를 떨었다..
-_-;
아무튼 같이 진행하는 사람이 맥 세팅의 문제로 kaist 버전을 진행했고 나도 따라 했다.
- gcc, qemu 설치만 하면 끝이라 실제로 세팅이 정말 간단했고
- 64비트로 되어있다.
프로그램은 이미 64비트로하니 이걸 기준으로 하는게 맞는데, 여기 요구하는 지식들이 32비트랑 비교해서 세부적으로 차이도 많고…
주소 체계, 스택, 바이트 정렬등이 다르기에 쉽지는 않겠다 생각은 했다..
관련해서는 아래 아티클을 참고.
세팅
내 환경은 다음과 같다.
- wsl2 : ubuntu 18.04
- gcc 7.5
- qemu : 2.11.1
버전 세팅 따로 한것없이 install gcc , install qemu 로 한 디폴트 세팅으로도 작동할 정도다.
처음에 ubuntu 20.04LTS 로 했더니 userprog 인자 실행에서 Load_segment 쪽에서 계속 fail이 나서 하루동안 골머리를 썩혔는데, 이게 이미 코드를 짜고나서 테스트 하면서 난지라.. 내 코드 문제인지알고 봤더니 내 pc문제였다..
1
2
3
4
5
6
7
8
9
10
11
12
13
14
15
16
17
18
19
20
21
22
23
24
25
26
27
28
29
30
31
32
SeaBIOS (version 1.13.0-1ubuntu1.1)

iPXE (http://ipxe.org) 00:03.0 CA00 PCI2.10 PnP PMM+0FF8CA10+0FECCA10 CA00


Booting from Hard Disk..Kernel command line: -q -f put args-single run 'args-single onearg'
0 ~ 9fc00 1
100000 ~ ffe0000 1
Pintos booting with:
        base_mem: 0x0 ~ 0x9fc00 (Usable: 639 kB)
        ext_mem: 0x100000 ~ 0xffe0000 (Usable: 260,992 kB)
Calibrating timer...  261,734,400 loops/s.
hd0:0: detected 305 sector (152 kB) disk, model "QEMU HARDDISK", serial "QM00001"
hd0:1: detected 20,160 sector (9 MB) disk, model "QEMU HARDDISK", serial "QM00002"
hd1:0: detected 102 sector (51 kB) disk, model "QEMU HARDDISK", serial "QM00003"
Formatting file system...done.
Boot complete.
Putting 'args-single' into the file system...
Executing 'args-single onearg':
fail
Kernel PANIC at ../../userprog/process.c:73 in initd(): Fail to launch initd

Call stack: 0x8004217768 0x800421add9 0x8004207412.
The `backtrace' program can make call stacks useful.
Read "Backtraces" in the "Debugging Tools" chapter
of the Pintos documentation for more information.
Timer: 62 ticks
Thread: 35 idle ticks, 26 kernel ticks, 1 user ticks
hd0:0: 0 reads, 0 writes
hd0:1: 49 reads, 232 writes
hd1:0: 102 reads, 0 writes
Console: 1066 characters output
버전만 맞춰서 새로 세팅하니 문제 없이 작동..
본문
The easiest way to get an overview of the programming you will be doing is to simply go over each part you’ll be working with. In userprog, you’ll find a small number of files, but here is where the bulk of your work will be:
-
process.c,process.hLoads ELF binaries and starts processes.
-
syscall.c,syscall.hWhenever a user process wants to access some kernel functionality, it invokes a system call. This is a skeleton system call handler. Currently, it just prints a message and terminates the user process. In part 2 of this project you will add code to do everything else needed by system calls.
-
syscall-entry.SSmall assembly codes that bootstrap the system call handler. You don’t need to understand this code.
-
exception.c,exception.hWhen a user process performs a privileged or prohibited operation, it traps into the kernel as an
exceptionorfault. These files handle exceptions. Currently all exceptions simply print a message and terminate the process. Some, but not all, solutions to project 2 require modifyingpage_fault()in this file. -
gdt.c,gdt.hThe x86-64 is a segmented architecture. The Global Descriptor Table (GDT) is a table that describes the segments in use. These files set up the GDT. You should not need to modify these files for any of the projects. You can read the code if you’re interested in how the GDT works.
-
tss.c,tss.hThe Task-State Segment (TSS) was used for x86 architectural task switching. However, in x86-64, task switching is deprecated. Nontheless, TSS is still there to find the stack pointer during the ring switching.
This means when a user process enters an interrupt handler, the hardware consults to the tss to look up the kernel’s stack pointer. You should not need to modify these files for any of the pojects. You can read the code if you’re interested in how the TSS works.
콜링 컨벤션 체크
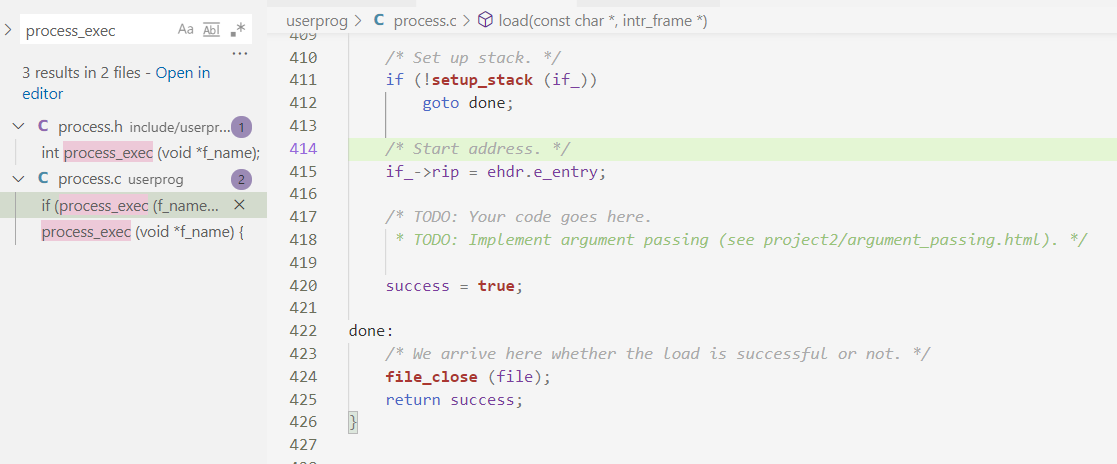
process_exec() does not support passing arguments to new processes
load 함수에서 여기다가 구현하라고 친절하게 적혀있다..
스택 사이즈는 16byte align 되어야함.
근데 어디 기준으로 얼라인이 맞아야하는지 잘 몰라서 찾아보니 rsp 주솟값이 16byte align되어있으면 되는듯하다.
실제로는 movaps, sse 사용이 이유긴한데… pintos 64bit 버전에서는 해당 부분을 신경쓰지않아도 되긴한다..

https://eeeuns.github.io/2024/02/12/alignment/
source ./activate
pintos --fs-disk=10 -p tests/userprog/args-single:args-single -- -q -f run 'args-single onearg'
1
qemu-system-x86_64 --version
argument passing
사실 알파이자 오메가 느낌으로 이 사진 하나가 끝이다.
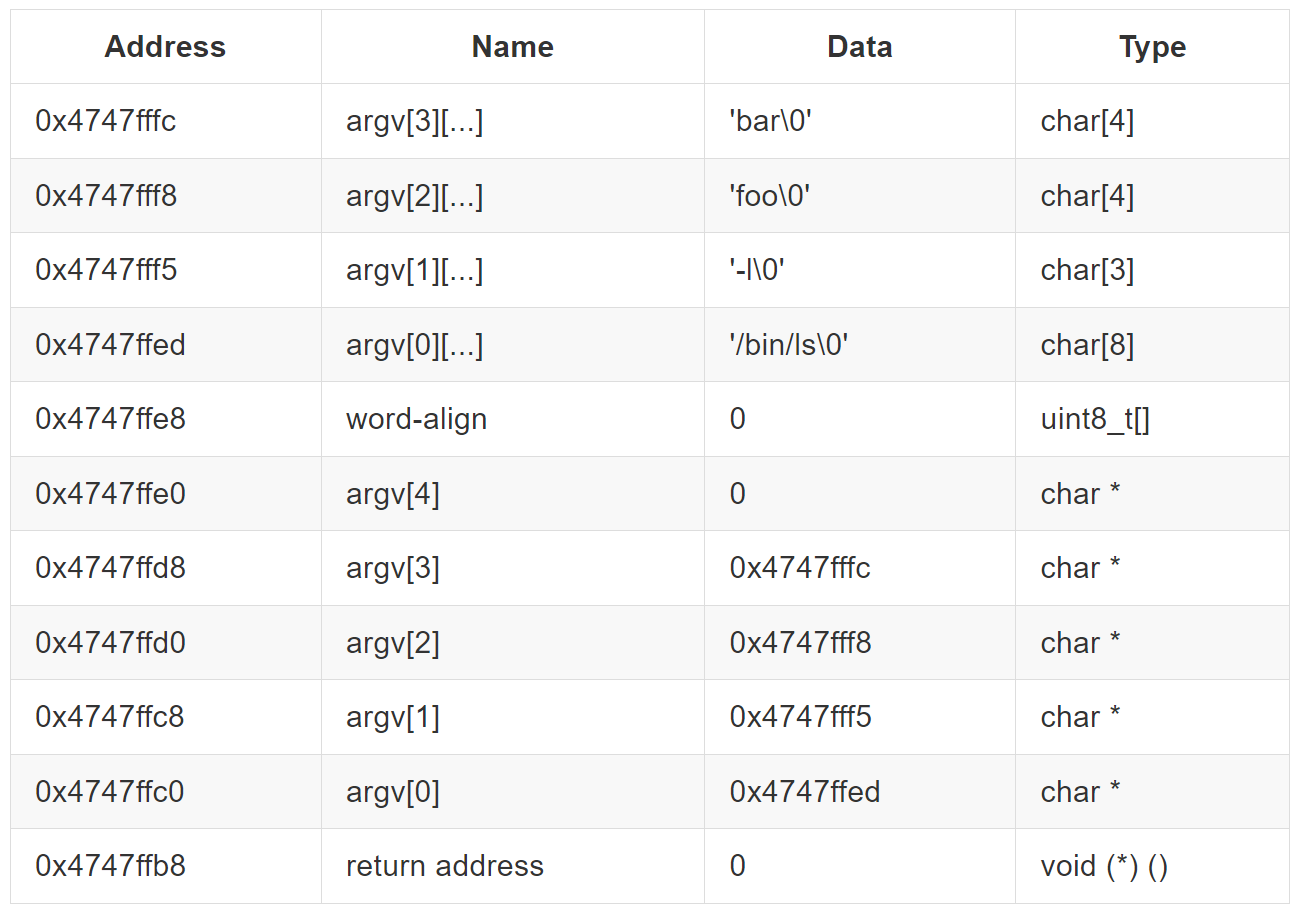
x86-64 calling convention 맞춰서 전달.
int main (char ** argv, int argc)
의 char ** argv, int argc 인자를 OS상에서 전달을 해주는 작업이다.
strtok의 경우 예전에 학교에서 과제로 사용해 본적이 있기에 상세 스펙을 아는 편인데,
구분자에 \0을 넣어 전달인자를 tokening한다.
따라서 원래 인자의 데이터가 변경되는 함수이다.
따라서 strtok으로 \0이 붙으면 이 전체 길이를 그대로 memcpy로 메모리 채로 붙이면 된다.
불필요하게 while을 써서 메모리에 strcpy등으로 복사할 필요가 없다.
물론 코드 가독성이나 이런걸 생각하면 while을 쓸 수 있겠지만, 가장 메모리에 밀접하게 작업하는 os코드인만큼 내가 생각나서 쓸 수 있는 가교는 최대한 부려보려고한다.
strtok 호출을 하면서 이제 시작 pointer를 반환하는데, 이 주소는 인자로 보낸 주소고 실제로는 스택메모리에 memcpy로 붙인 주소를 가르키게 수정해야한다.
여기에 대해서 한가지 생각한 건 주소 오프셋만 가르키게하고 스택포인터만 더 해주면 되도록 작업했다.
이렇게 실제 가르키는 주소를 하고 이 배열을 그대로 memcpy로 옮겨 붙였다.
코드 설계는 이렇게 쭉 작업했고, 타입형 변환쪽이 제대로 안되어서 값이 오버플로우가 나는지 의도대로 작동안하는 문제가 있어서 살짝 고생했는데 코드 수정 없이 그대로 작동했다.
1
2
3
4
5
6
7
8
9
10
11
12
13
14
15
16
17
18
19
20
21
22
23
24
25
26
27
28
29
30
31
32
33
34
35
36
37
38
39
40
41
42
43
44
45
46
47
48
49
50
51
52
53
54
55
56
57
58
59
60
61
62
63
64
65
66
67
68
69
70
71
72
73
74
75
76
77
78
79
80
81
82
83
84
85
86
87
88
89
90
91
92
93
94
95
96
97
98
99
100
101
load (const char *file_name, struct intr_frame *if_)

// load 맨 처음, file name을 전달해야하기에 초반에 tokening을 해야한다.
	char *p_argv[MAX_ARGS + 1];
	int argc = 0;
	int filename_len = strlen(file_name) + 1;
	hex_dump(0, (void *) file_name, filename_len, true);
	{
		//Implement argument passing
		char *p_token = NULL;
		char *p_save = NULL;
		p_token = strtok_r ((char *)file_name, " ", &p_save);
		while (p_token != NULL){
			if (argc > MAX_ARGS){
				ASSERT(false);
				success = false;
				goto done;
			}
			printf("token %s\n", p_token);
			p_argv[argc] = p_token;
			p_token = strtok_r (NULL, " ", &p_save);
			++argc;
		}
		p_argv[argc] = NULL;
		ASSERT (argc > 0);
	}

	ASSERT(p_argv[0] == file_name);

	hex_dump(0, (void *) file_name, filename_len, true);


// 	rsp 값이 정해진 이후. setup_stack에서 rsp 값이 처음 세팅된다.
	/* TODO: Your code goes here.
	 * TODO: Implement argument passing (see project2/argument_passing.html). */
	{
		uint64_t start = if_->rsp;
		if_->rsp -= filename_len;
		memcpy((void *)(if_->rsp), file_name, filename_len);

		hex_dump(0, (void *) if_ -> rsp, start - if_->rsp, true);

		{
			ASSERT(p_argv[0] == file_name);
			char *argv = if_->rsp;

			char *p_argument = file_name;
			ASSERT ( p_argv[0] == p_argument);
			for(int i = 0 ; i < argc; ++i){
				ASSERT(p_argv[i] != NULL);
				ASSERT (p_argv[i] <= file_name + filename_len);
				ASSERT ( p_argv[i] >= file_name);

				char * offset = p_argv[i] - p_argument;
				ASSERT (offset >= 0 && offset <= filename_len);

				p_argv[i] = (uintptr_t)argv + offset;

				//printf("token %x %x %x %x\n", p_argv[i], start, argv, offset);
				ASSERT (p_argv[0] == argv);
				ASSERT (p_argv[i] < start);
			}
		}

		if_->rsp = if_->rsp & (~0x7);
		ASSERT (is_8byte_align(if_->rsp));

		const int argvSize = (argc + 1) * sizeof(char *);
		if_->rsp -= argvSize;

		printf(" %x %x %x %x\n", p_argv, p_argv[0], start, if_->rsp);

		ASSERT (p_argv[0] > if_->rsp);

		memcpy((void *)if_->rsp, p_argv, argvSize);
		hex_dump(0, (void *)if_ -> rsp, start - if_->rsp, true);

		if_->R.rsi = if_->rsp; // argv
		if_->R.rdi = argc;

		ASSERT (is_8byte_align(if_->rsp));

		// RSP is 16 byte align
		if (is_16byte_align(if_->rsp)){
			if_->rsp -= 16;
		}
		else{
			if_->rsp -= 8;
		}

		//return address
		*(uintptr_t *)(if_->rsp) = NULL;
		ASSERT (is_16byte_align(if_->rsp));

		hex_dump(0, (void *) if_ -> rsp, start - if_->rsp, true);
	}
실행을 하는데 아무런 print가 출력이 안되서 왜 그러지 하고 봤는데
유저 프로그램은 스레드 분리가 되어 따로 실행하는데 main thread는 thread분리 이후 그대로 종료를 해버려서 그냥 프로그램 자체가 종료를 해버려서 출력이 안되더라..
process_wait 쪽 while 을 무한루프로해서 대기를 시켜야하는데..
이게 왜 설명이 없지하고 보니까 스탠포드 쪽 문서엔있는데 카이스트 문서엔 없더라…
.png)
후기
감회가 새롭다.
단기 실력향상이 매우 컷고, 하루종일 생각하고 몰입해서 순수 내 힘으로 코드를 작업했던때가 thread priority 작업이었는데
핀토스 세팅을 하면서 이 때 느낌을 다시 느낄 수 있을까 싶어서 굉장히 두근두근했다.
생각보다 처음 핀토스를 잡아서 thread 쪽을 작업했었을때 느꼈던 그 느낌에 비해서 그렇게 어렵지않았다..
처음 작업하던 당시 OS 과목을 따로 공부하지않았고..(일반적인 학부 수업 수준만으론 도움안되는건 똑같은듯..)
특히 카이스트쪽 문서가 굉장히 잘되어있고 실제 코드단에서도 어디다 작업해야하는지 설명이 잘 되어 있어서 더 간단하게 느꼈다.
생각하는 난이도의 대부분이 요구사항을 구현하기 위해서 어디를 어디까지 뜯어고쳐야하는지 이 부분이 가장 어려웠었는데 아예 코드에 어디를 찍어서 여기다가 코드를 짜세요 라고 가리켜버리니..
제대로한다면 이런 가이드 하나도 없이 pintos 전체를 분석해야할 건들 수 있는 스탠포드 쪽이 진짜 실력향상이나 이런 쪽으론 더 좋을것같다.
Argument passing의 경우도 아예 이런 input에 대해서 스택 메모리에 이렇게 쌓여야한다는 결과를 아예 그림으로 박다보니 더 그렇게 느끼는 것도 있는 듯하다.
물론 조금만 잘못 손대도 핀토스 자체가 커널 패닉으로 박살나서 원인 분석에 꽤 어려움이 있었는데 예전의 그 아무것도 알려주지않는 어려움은 여전하지만..